Showing posts with label intelligence. Show all posts

Friday, 16 December 2016

Learning Shift 2016


This year has been huge for me, with so many things going on, but the main reason I am even here is for my kids. 
I have spent a lot of time helping Archana with our senior syndicate data, creating graphs and comparisons. 

Together we have made a huge shift with our students. 
Here is the 2016 data for my class.


Year 4 Reading
MarchNovemberDifference
Above0%26.09%26.09%
AT0%60.87%60.87%
Below29%13.04%-16.37%
Well Below71%0.00%-70.59%
100.00%100.00%
For the non-teachers reading this, these statistics are related to National Standards [NS] for year 4. 
As you can see, 0% of our class were at the NS or above it at the beginning of the year. Not one kid.. But not, about than 2/3 of our class are at or above the NS. These students have moved from Well below (note the 71% of our class who were here in March). This is a HUGE shift for our kids.


Year 4 Writing
MarchNovemberDifference
Above0%13.04%13.04%
AT6%56.52%50.64%
Below47%21.74%-25.32%
Well Below47%8.70%-38.36%
100.00%100.00%
Our writing data is very consistent - you can almost track the students who moved from Well Below (March) to Below (Nov), or from Below (March) to At (Nov), or from At (March) to Above (Nov). We have made very good shifts in writing. 


Year 4 Maths
MarchNovemberDifference
Above6%21.74%15.86%
AT12%52.17%40.41%
Below82%17.39%-64.96%
Well Below0%8.70%8.70%
100.00%100.00%
Again for any non-teacher readers, this Well Below goes from 0% to 8.70%. This may seem like a child went backwards, when in fact they just didn't move at all. The marker for NS changes from March to November (as they should have learnt some stuff between these months!) so this child essentially stayed at the same level of achievement instead of moving with it, hence moving from below to well below. The rest of our class did great in maths. 82% of our class was Below (March) and at the end of the year only 17% were. 

Overall this data shows huge shifts in all learning areas.
The main area I personally felt that I want to focus a bit more attention on was moving the At and Above kids even higher.
A lot of emphasis gets placed on Below and Well Below students, and getting them to the norm, and this has been achieved in our class (mostly).
However some of my highest students were always the ones helping others, and did not get as much attention and targeted teaching as the very low students, hence they stayed where they were instead of moving as high as possible.
Other teachers have found a similar thing in their data, so this is a something we have discussed and we already have some ideas about how we can achieve shift for these students as well as the target students.

I am very proud of how hard my students have worked and how much they have shifted. I know I gave planning/teaching my everything this year and I am proud of myself as well.

Thursday, 6 October 2016

Breakout #4 - uLearn 2016

This afternoon I am going to a session run by OMGTech.
Originally, I was supposed to go to another session, but I have been getting very into Coding and seeing how I can use science and STEM subjects in schools more and more, so I was naughty and skipped my session and joined in on this one.. no regrets!

One of the first things I heard when walking in the room was...

"Coding is hard and you should fail"

What a great start! Immediately setting up an atmosphere, not that it is okay to fail, but that in fact, you should fail. You should fail. It's good for you. That immediately takes the fear out of not knowing what to do, and the embarrassement out of other people judging you (or you thinking that they are...)

The session was then split into 20 minutes chunks, where the partipants were split into four groups, and spent 20 mintues at each 'station' before rotating around to spend the next 20 minutes at the next 'station'. The four 'stations' were Robotics, 3D printing, coding, and unmaking. For each of these you 'made' or 'did' something - it was very active learning. 

Robotics

For Robotics, we were seated at a laptop which had a programme open which allows you to add code that controls a robot. We were given the challenge of programming said robot (we had one each) to drive from point A, over a wooden bridge of pretend ruble to point B to save the injured person, then drive them to point C. All of this had to be done using code such as
leftTurn(1000)
goForward(500)
goBackward(1200)
rightTwist(200)
The numbers e.g. (200) are used to indicate the amount of time spent doing that action, not the distance to be covered. That made it a little harder.

I did pretty well, I must admit.. Watch the video to see how my robot went!

3D Printing

 The next station was 3D printing - we logged onto computer which had this open..

Then we just played around with all the functions that allowed you to create a 3D shape. There were generic shapes, letters and numbers from which to choose. You could change the size, location, height away from the ground, colour, distance away from other objects etc. It was hard! 
I found an ear type shape and decided to make a bunny. It didn't turn out that bad... I found it quite hard to get the eyes/nose/ears/whiskers actually attached to the head. As I was looking at in in a 2D mindset, from my point of view the pieces were almost 'layered' on top of each other and hence looked like a bunny. However, when I changed my view, it was a different story. Both eyes were different distances away from the face, one ear wasn't attached and I don't know what I did but somehow the nose fell off onto the ground? Well, that made me have to really think about the way my object would have been printed. If I had printed it using the 3D printer that they had there, it would have been all seperate pieces, instead of one bunny head with pieces attached. 


It was fun to play around with the model maker, but interesting to note that the guy running this 'station' kept saying how 3D printers aren't actually that great for schools, as they take hours and hours to print something tiny and somebody needs to watch it the whole time. If nobody is watching, and something goes wrong, it can wreck the entire printer which costs a LOT of money...

Unmaking

Un-making is exactly what is sounds like. What is the opposite to making? Taking apart. 
This was not done for fun - it is for trying to understanding how something works and see for yourself the parts involved and how those are connected to each other. 
We started off with these...


Yeap, old CD/DVD players.


The guy taking this 'station' talked about all technology has evolved. His example, was the record player. An old technology, seen by modern peoples as ridiculous and pre-historic. Yet, when you compare the record player to the floppy disc, and the floppy disc to the CD/DVD player, they are essentially, at a nuts and bolts level, the same thing. Admittedly, they do get a lot smaller, a lot more powerful and able to handle much more data - but the way the data is held and pulled off is the same way. People just don't realise it.


These were the four things we were asked to 'find' in our CD players once we had un-made them. On the left, the unicorn, which holds and moves the CD; in the middle, the laser and its mirrors, which are used to get the data off the cd and transit the data to the data reader; and the squishy things (yes, really). These are used to hold the laser steady.. I think? Not really sure what they do really, but they were fun to play with.. 

Coding

 The last station was game coding using Scratch.  Matthew talked us through the main 3 steps of game design 
1. have a character
2. have a problem
3. have a goal

Each of us then designed a game using these three steps. I made my own game way to hard, and kept dying when I tried to play it and film it. 


From this photo of making my game, you can see the actual game screen on the left hand size (the maze looking thing) and the gamers code on the right. What you do in scratch is you drag and drop different commands for the various characters or the game map itself, into a particular order so that the game follows a particular sequence. 
There are endless possibilities. 

Thursday, 1 September 2016

Science Week - HUMAN BODY (Thursday)

Today we really focused on trying to create our models of the body. 

I am kind of embarrassed to say this, but there was a lot of colouring happening...
(I promise I don't normally do colouring!)


The end goal was to have something that kinda looks like this - 

Each organ has a 'flap' underneath it for students to write the function of each organ. 
For example - 

In the planning, this meant that each kid needed each organ, twice (essentially). This was a bit of a nightmare as it meant A LOT of paper, A LOT of cutting, A LOT of laminating, A LOT of rubbish covering the classroom floor. It also meant all night on Wednesday Archana and I were working cutting and prepping the bodies ready for today, which was a mission!

But, we did it! 

Here are two of my lovelies showing off one finished body, as well as the app Anatomy 4D we used to look at the heart in detail. We posed for this photo for Paula (the lady who recommended the app, so she could go and share what we had done with her peers - go us!)


These two photos are screenshots from a video, hence the questionable quality, but they show the kind of 'flap' notion. The organs are layered in the order they are anatomically - ribcage protecting lungs, heart inside of that, pancreas and liver sort of in front of stomach/kidneys, bladder underneath intestines, etc. So for Falakika (above) to show the lungs to talk about them, she had to move the ribcage out the way! Hiria (below) had to lift the skull to show off the brain.

One of my new lovelies who doesn't speak a lot of English became my little helper for the day, helping me organise everybody's body parts, matching the flap and the writing piece, taping the lungs to the trachea, taping the ribcage together, etc etc. She got so talkative (Yes, in English!) and was having a great time helping me and being the expert for once (instead of being the one not knowing what was going on).

It was so weird for it to be normal to call across the class things like "have you written on your organs yet?", "who has a spare kidney?", "if you have finished cutting up your body parts come here please", "you need three lungs!", "have you got your brain with you?" etc etc.  So weird, but at the same time, so awesome that the kids were on board and knew exactly what I was talking about all the time. 

It was a VEEEEEEEERRRY stressful day, but, we got there in the end!

Saturday, 13 August 2016

Digital Immersion (Term 3, Week 3) - Garageband!


Today we are learning how to use Garageband, with help from a Point England School teacher Rob Wiseman, who in a previous life was a music teacher and audio buff. I took screenshots and screen recordings as we went so I could blog them, as I had zero knowledge to connect to with Garageband and I just knew I would forget everything if I didn't write it down..

He talked us through 
how to get into Garageband 
(which is more complicated than it sounds)
When you open Garageband, you get this screen.

Each of the different buttons shows a different screen when you go into it, so you really need to know what you are wanting to do before going in to it. We went into the 'empty project' button.


Then this opens, and you have to select what kind of music you are going to create - we went with Audio (the microphone). 

It opens up like this. The far left hand box is called your library, the middle 'box' is where your tracks layer up, and the black box on the right is where your waveforms live once you have added audio.

What to do before you do anything!
Change all your settings! Make it how you want.. (And get your head around what is what)

You can alter the key, which here is 'C major', and you can also change the beats per  minute, which here is 120. The Music note and metronome icon on the left hand side mean that it is in 'beats and projects' mode, and can be changed to 'time' mode by clicking it and selecting time.

Rob explained that our laptops will automatically be on 'System Settings', and the audio quality will be better if we go in and change the settings to reflect what microphone/headphones you are using - even build-in output/microphone is better then using System Settings.  (Access this by going Garageband/Preferences).

Each layer of the audio file you are adding is called a 'track' and looks like this in the middle-left of your screen. If you have multiple tracks, you can mute one or more by clicking the mute button, or only allow the noise through headphones. The green bar shown is the volume you are recording - you should aim for the audio to be around that little ball, or slightly higher. 

The '1,2,3,4' on the right hand side gives you a 4 count count-in, so you have time to prepare and take a breathe before starting to talk. The speed of the 4 count will be at the speed of the number of beats, for example mine is set at 120 bpm. If you select the other buttons on the left-hand side, such as the metronome or the tuning fork, you can have those sounds to guide your audio recording.

When recording audio, it creates the waveform alongside your track. The larger the wave, the louder it is; the smaller is it, the quieter the audio is.

Recording Audio

Firstly we just played around with recording...


Then we actually recorded ourselves reading a children's book.
 As you can see, I actually missed a page in the book and had to add that section in. It was hard to try and make my voice the same volume and pace! I also (purposely) took lots of deep breathes, read it wrongly etc so I then had to practice editing those parts out.

Editing in-track

  
The button on the far right-hand side with the camera and music note icons allow you to easily access all the audio and movie files on your computer, and drag them into your open project. You can also easily drag-and-drop from your desktop.

To 'cut' or 'split' the audio file, put the playhead where you want to cut, go to 'edit' and select 'split regions at playhead'. Also de-selecting 'Snap to Grid' makes editing audio easier. 


For super-fine editing, select the region you want to edit, double click or press 'E' and a separate, more detailed editing box pops up at the bottom. Hold your cursor inside the bottom half of the audio track, and it will turn into a cross, allowing you to click and drag sections of the audio to then edit.


Screen Shot 2016-08-12 at 11.05.30 am.png
By clicking any track and hitting ‘B’, you bring up the smart controls at the bottom of your screen. The reverb and ambience on the right hand side, when dialled up a little bit can make your audio sound much better e.g. giving the illusion of space between the voice and the microphone, which makes the voice sound better.

Compressor - mediates your wave volumes to make them more even.

By keeping a track selected, you can change the voice by playing around with the 'voices' inside the library. If you have exited the library, press 'Y' to bring it back again.

Well, that was a very detailed note-taking of our Garageband lesson with Rob! Here are some shortcuts for Garageband version 10 that Rob gave us. Thank you so much Rob, I literally knew none of this without you! And thank you viewers who made it to the end haha, hope you learnt something new!

Friday, 13 May 2016

Growth Mindsets


Today one of my students really surprised me, in both a good and a bad way.
My students were using the TOPS model to plan for their narrative writing. 
This is this particular students planning - 

Title
Maui and the goddess of fire

Orientation
Who? Maui , MauiÅ› grandmother , servants and Maui´s mother.
When`? Night
Where? Mahuika and Bali MauiÅ› Village
What happens?Maui goes to get some fire
Why ? Because they ran out of fire.
Problem
MauiÅ› mum told to him don't play tricks on your grandmother or she will get very fiery.
Each time when maui got a finger nail of fire he kept and flicking it into the water.
Because he flicked them the village had no fire.


Solution
Maui escaped  from his Grandmother's house.

I commented digitally on his Google Doc, and his reply made me speechless. 


He replied "Miss that's not supporting my [growth] mindset."

Some background story - towards the end of Term 1, I talked to my class about growth mindsets and asked them to point out to myself and my co-teacher if we give them feedback that doesn't support their growth mindset, to make it a joint venture and share the accountability. Feedback that supports a growth mindset focuses on the learning process and what the outcome shows the child has done or can do, rather than valuing the outcome itself. This student was right; my comment 'awesome use of keywords' was not supporting a growth mindset, as it didn't discuss the learning process itself. 

I didn't think they would actually do it.. but this student did. 

I was slightly embarrassed to be called out like that by one of my students, but in his defence, I did ask him to..

So, another example of successful building of class culture. What will be next...

Wednesday, 6 April 2016

Maths observations

Today I was observed by Sue Pine, our TPS Maths PLG leader (an expert bought into the school to help us get better at teaching maths.)

Eek! Although I was nervous, I did feel as though I have gotten a lot better in the past few weeks at teaching maths and using talk moves and number talks. (Scroll further down in my blog to see previous observation notes.)

I knew I was proud of how far I have come, so having somebody observe me and give me next steps was a nerve wracking next step for me.

Things I did well
A well worded problem
 (Sue even said that this would be a really good national standards problem for testing the strategies students know and used, as there are many ways to solve it.)

Connections
(I used the same number for my number talks as in my problem (24) so students could apply the knowledge they had talked about in the number talks to their feijoa word problem.)

Structure
(I used a good structure of my lesson and it generally flowed nicely from one activity to another.)


Things to work on
Launching the problem
(I can work on this by ensuring I read the problem aloud, then talking to the students about the problem and ensuring they understand what the problem is asking them to do, what are the important parts etc.)

Pace
(I can keep working on this by choosing wether to do number talks or the warm up, whereas I had been doing both of them. This will cut ten minutes out of my lesson and help me speed it up. Another thing I can work on is getting the students who have understood the problem and are just sitting to get started with their follow up work, and continue my eliciting answers and talking about them with most of the class instead of all of the class, then quickly moving onto smaller group clinics with those students who need it most.)

Other notes
Growth mindset
(Sue pointed out that at one point, I told a student 'you are so smart'. This encourages a fixed mindset. I always try to make my praises about the learning, but evidently some comments still slip through. Tomorrow I will be sure to change my comments to things like 'you are thinking very hard', 'you explained your thinking very well'.)


Wednesday, 23 March 2016

Encouraging metacognition


Everyday, I ask my students, "what did you learn today?"

And every time I ask them, they always have something to say. I accept (most) answers, as all learning matters. What they learn in maths and reading is important, yes, but so are developing social skills and their ability to think and talk about their own learning.

It is a class, syndicate and school wide goal to get our students to think more about their own thinking (metacognition) and to talk about their thinking. Simply asking them for one thing they learnt that day is a great way to get them to

  • think about the new things they learnt that day
  • to have their learning on their mind as they are walking out the door at the end of the day instead of what they did at lunchtime. 
This is Tuesday's response

Today I learnt... 23 March 2016 from Tamaki Primary on Vimeo.

You will notice a lot of them talked about their blogs, as we did a focus session on accessing their blogs and how to post for the first time (they are very new to their blogs).

I plan to show them this video, and talk about the benefits of talking about our learning, and different ways we can show what we have learnt.


Friday, 12 February 2016

Digital Immersion - day 1


 Today was the first day of the Digital Immersion part of the MDTA programme. It is based at the University of Auckland Tamaki Campus in St Johns, Auckland. As I was at the MIT Campus in Otara for my BEd, its exciting to have another new place to learn, study and make home.

We started our day with a breakfast at the university cafe, and then proceeded up to our class. We started with discussing how our classes/schools/mentors are going, and it was refreshing to know we all chose the same or similar keywords to describe our experiences.

Relationships - Communication - Engagement - Enthusiasm

Throughout the day, we learnt new things about using Google Drive, and specifically Google Docs in order to prepare us for our digital classes this year.
A lot of it we already knew as some-what tech savvy young adults, but you don't know what you don't know so its always good to review. 


Towards the end of the day, we made Google Drawings to represent our personal reflections for the days learning. Here is mine - 
It reflects one thing that has stuck with me all day. We are here to learn and become digital teaching experts, but we also need to teach others the things we learn along the way. This relates to the concept of Ako, which means to teach and learn together. 


Tuesday, 2 February 2016

Fixed v. Fluid Intelligence Mindset


Fixed v. Fluid Intelligence 
This afternoon Archana and I reviewed this video in order to prepare for our syndicate meeting tomorrow. A good refresher of the theory I studied in my BEd around this topic. 


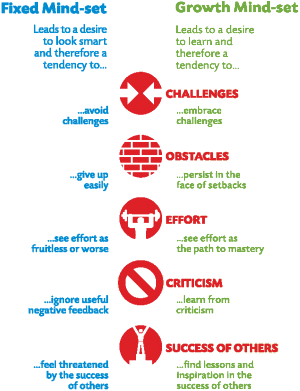
Here is a simple diagram to illustrate the difference - 

Picture
(from http://www.onehundredhomes.com/blog/fixing-my-fixed-mindset)

It was interesting that during my observations of Archana today was of the way she spoke to the children (read more here). Funny timing huh?
It is definitely something I need to think about, and how what I do and say does affect my students and their mindsets. Future PD to come...